When talking with network and cloud professionals, one of the most frequent questions I hear is, “How can we automate our IPAM and networking for hybrid and multi-cloud environments?” . IP Address Management (IPAM) for the cloud can be challenging and the tools provided by the cloud providers vary; most public clouds don’t even have services for IPAM. Those that do are limited to management of IPs in their cloud alone, leaving you with multiple disparate systems for IPAM across your hybrid and multi-cloud networks. This makes things complicated, especially for companies at the beginning of their multi-cloud journey.
The good news is multi-cloud network automation doesn’t have to be so complicated. Using a consolidated IPAM solution from Infoblox, you can automate management of IP networks across all your hybrid and multi-cloud environments with consistency and reliability. In this blog, we’ll explore a model for multi-cloud network automation using Infoblox NIOS. First, we’ll look at how to plan for IP usage in multi-cloud environments, and how features available in NIOS can be used for automating multi-cloud IPAM. Then, we’ll dive into an example of how to put this into action, including a sample Terraform module you can use to get started.
Plan for IP Space
One of the first steps in creating a successful multi-cloud network automation strategy is planning your use of IP space. You’ll want to ensure you have adequate IP space allocated for each of the clouds to avoid running out. You’ll also need to account for how these fit with your overall IPAM and routing design across your entire network including on-premises, private and public clouds. The following are some questions to consider, and some examples from my multi-cloud network.
How many and which clouds will you use?
For my network, I use 3 public clouds, Azure, AWS, and GCP. It is also important to plan for future expansion. You may be using primarily one cloud now, but are you likely to use additional providers in the future? I have an upcoming project in OCI, so I’ll allocate space for this as well.
How much IP space do you need for each cloud?
This can be a hard question to answer. You will need to consider things such as the number and types of applications and services you’ll use, as well as allowing space for future projects. I’m expecting large usage across AWS, Azure, and GCP, so I’ve allocated a /16 CIDR (Classless Inter-Domain Routing) for each. OCI will be limited to a few specific services, so I’ve only given it a /20 CIDR.

An alternative approach is to use the same CIDR ranges in each cloud or region and rely on Network Address Translation (NAT) to allow routing throughout the network. This method has the advantage of conserving available IP space. However, it also has some drawbacks, such as added troubleshooting complexity as well as cost and management overhead for NAT gateways and other services.
How will you divide the IP space for each cloud?
There’s no wrong answer to this if it makes sense for your business. I’m using 3 regions in each of the clouds, so I’ve started by allocating a /18 CIDR per region. I also want to maintain boundaries between my Dev, QA, Staging, and Production environments so I’ve further divided each region’s space with a /20 CIDR for each environment.

Alternative approaches could include allocating space for different business units or products. Keep it as simple as possible, ensuring that it works in the context of your business.
Most public cloud providers publish documentation on allowable IP ranges in their networks. You should consult these before deciding on specific IP ranges to use: AWS, Azure, GCP.
Network Containers
To represent the structure and subdivision of cloud IP space in Infoblox NIOS, we’ll use network containers. Network containers are defined by a large CIDR and can contain multiple smaller network containers or networks. We’ll also use network containers to represent the VPCs (Virtual Private Clouds) created in each of the clouds. For my network, I have a network container for each cloud, with a nested container for each region under these, and another nested container for each environment under each region.


If you are reusing the same CIDRs across cloud providers, you’ll need to use multiple network views as the top layer, for example, you could have a network view for each cloud with network containers for the next level of separation under these.
Use Extensible Attributes
Extensible attributes or EAs function like tags found on many cloud platforms, storing additional identifiers for your objects in key/value pairs. Infoblox NIOS comes pre-populated with a handful of EAs, and you can create your own to match the organization you’ve planned for your multi-cloud network. To take full advantage of EAs in your automation, ensure each network container ends up with a unique set. I have EAs for cloud, region, and stage. I’ve also created an EA for Application, which I’ll apply at the VPC level, ensuring my network containers retain a unique combination of EAs.

Using EAs in this manner means you don’t need to worry about finding the right CIDR for a new VPC; instead search for the container based on these attributes. For example, if I want to create a VPC in AWS, us-west-1 region, for prod stage, searching with this combination of EAs gives me one specific container.
Next Available Network
Once you’ve got the basic structure of network containers in place, the next available network function available in the Infoblox API is going to do all the heavy lifting. This function takes a parent CIDR (network container) and a network size, for example 24 for a /24 network, and finds the next available block of that size in the parent. The output of the function is then used to create a new network container or network. In my automation examples below, I use this function to both find the next CIDR block available for new VPCs and to create subnets in the new VPC.
Combining this function with a search based on the EAs you’ve assigned to network containers makes it even more powerful. As described in the EAs section, I can find the container for AWS, us-west-1 region, dev environment, and then ask for the next available /24 network in the container that is found without even knowing the CIDR. This is especially useful for network teams creating automation workflows that will be consumed by DevOps or CloudOps teams who deploy these new networks in the cloud.
With network containers in place for the structure and EAs defined to allow easy searching, we’re ready to start using the NIOS API to automate allocation of new VPCs and subnets in the cloud. You can use a tool of your choosing to call the API, and Infoblox maintains ready-to-use plugins for tools including Ansible, VMware Aria Automation, and Terraform.
Network as Code
Network as Code (NaC), sometimes referred to as Network Infrastructure as Code (NIaC), is a subset of Infrastructure as Code (IaC), where IaC principles and techniques are applied across the full network stack. Terraform is one of the most popular IaC tools and includes plugins, known as providers, for all major cloud platforms as well as Infoblox, making it a good choice in implementing NaC for multi-cloud environments. I use Terraform for my example as it is well suited to this type of infrastructure automation.
Infoblox Cloud Network Module
Terraform modules offer a way to group configuration for multiple resources and types of resources. Creating modules allows you to reuse configurations by calling them with different input variables for each unique deployment. The Infoblox Cloud Network module uses one data source and two resources from the Infoblox Terraform provider. You can call this module directly from your Terraform configuration files, or more likely, use it as a starting point and customize it further for your company’s multi-cloud networks.
The screenshots and descriptions below cover a few of the key components of this module. For a full explanation of inputs, outputs, and usage see the documentation and comments included in the module.
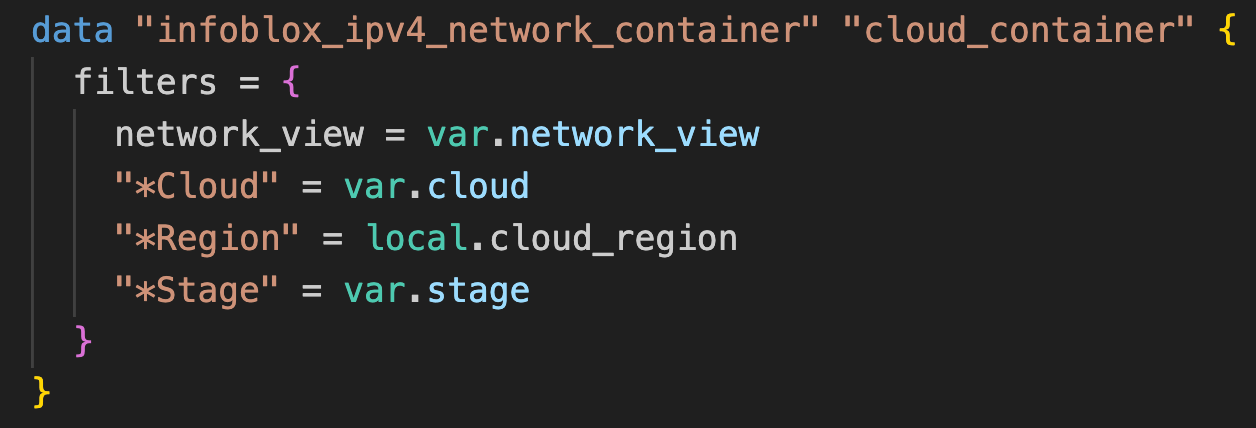
The data block for infoblox_ipv4_network_container searches for a parent container using the network view and EAs assigned as filters.

The resource block for infoblox_ipv4_network_container takes the CIDR of the network container returned by the data block (parent_cidr) and the network size (allocate_prefix_len) as inputs to create a new container using the next available network function.

The resource block for infoblox_ipv4_network takes the CIDR of the new network container (parent_cidr), the number of networks to create (count), and the network size (allocate_prefix_len) as inputs to create networks using the next available network function.
Creating New VPCs
To create new VPCs or VNets in the cloud, we can use the Infoblox Cloud Network module along with VPC/VNet modules published by public cloud providers. Example configuration files are included in the module for AWS, Azure, and GCP.
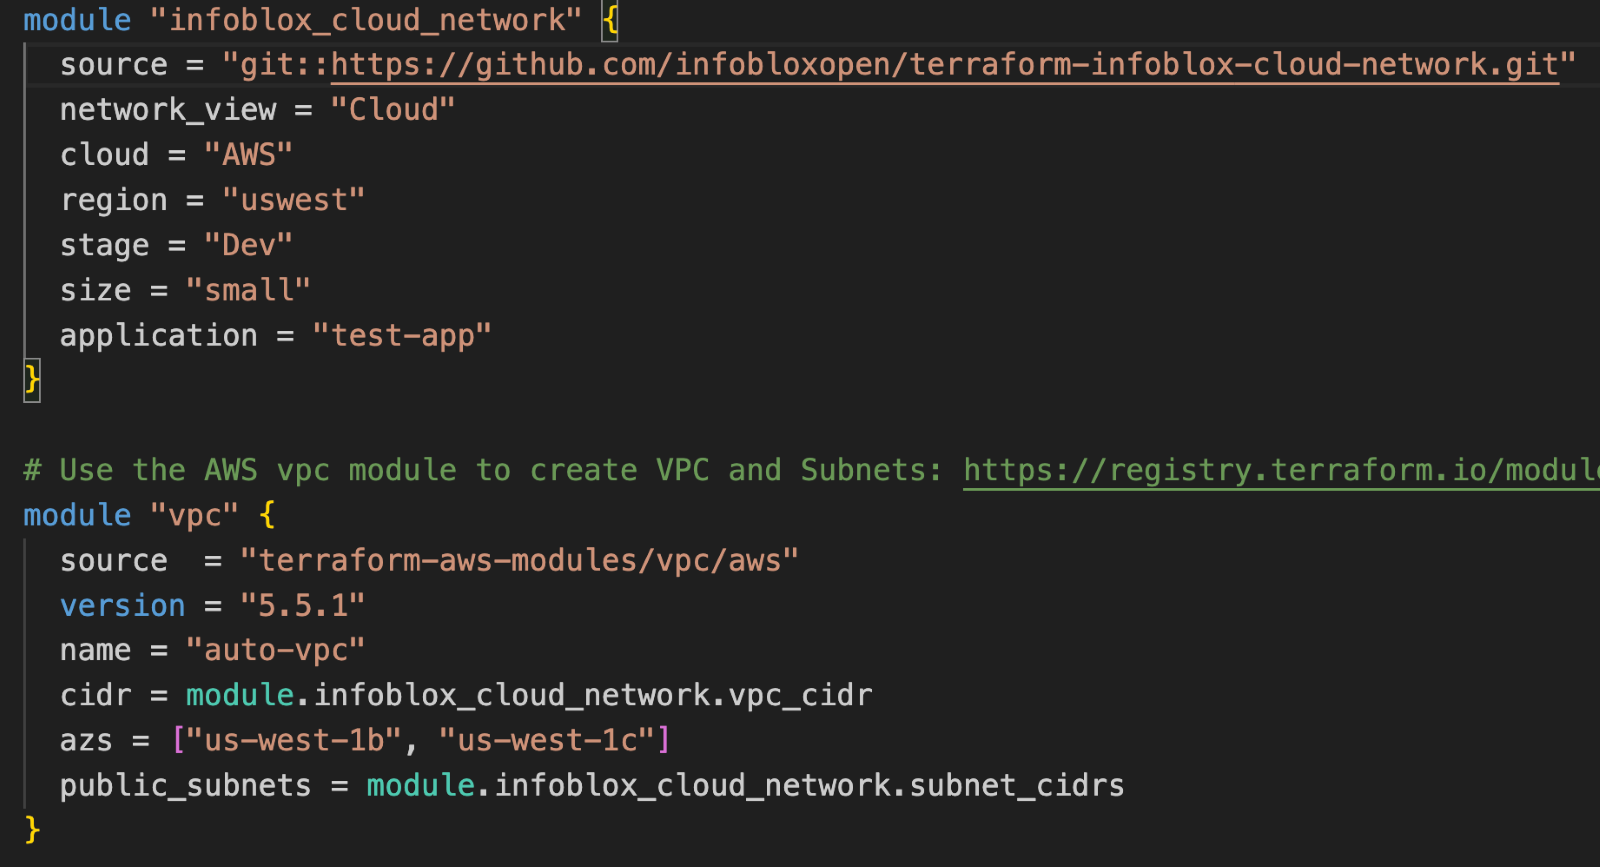
In this example, the first module block calls the Infoblox Cloud Network module with required inputs. The second module block calls the AWS VPC module with required inputs, using CIDRs returned from the infoblox_cloud_network module for VPC and subnet CIDRs. Running the terraform apply command in the directory containing this configuration file, creates a new network container with networks in NIOS, and a VPC with subnets in AWS.


Next Steps
Creating a plan for IP usage across your multi-cloud networks is the first and arguably the most crucial step in implementing multi-cloud network automation. With a plan in place, Infoblox solutions provide features such as Extensible Attributes, Next Available Network function, and a Terraform provider to support multi-cloud network automation. The Infoblox Cloud Network module included with this blog, or your customized version, can be used to start automating VPC and VNet deployments directly. Or integrate this model into your tooling to create a full continuous integration and continuous delivery (CI/CD) pipeline for your multi-cloud network infrastructure.


