One of the hardest challenges for any person or organization is to get proficient in IPv6 with a network that isn’t running IPv6 at all. But it’s not advisable to implement IPv6 in production without carefully planning the configuration. So how do you adopt and deploy IPv6 confidently when you haven’t really had any hands-on experience with it?
An IPv6 lab is the way to address skills gaps, gain experience with IPv6, and learn and observe how IPv6 works on all the platforms you run within your environment. There are several strategies you can use to build an IPv6 lab:
- Build a physical lab environment in your data center or existing lab facility.
- Build a virtual lab with a network emulation solution in your home or office using one or more of the following: EVE-NG, Cisco CML, GNS3, ContainerLab, or netlab.
- Build a virtual lab with the same network emulation solution using public cloud resources in AWS, Azure or GCP.
But before you get started with those platform options, you need, at a minimum, a network design and architecture strategy for your lab. The focus of this article is to work out the IPv6 design and some network options you can leverage to make end-to-end testing more effective and useful. Future articles will focus on how you do that in the given environment you might choose to run the lab in.
Lab Goals:
Let’s define some goals for the lab so we can make sure we are building an IPv6 lab architecture that meets some minimum requirements.
- Can use both Global Unicast Addresses (GUA) and documentation address space (2001:db8::/32).
- Has both dual-stack and IPv6-only network segments.
- Has multiple transition technology options running in the lab such as NAT64/DNS64, SLB64 or other application proxy services.
- Includes an IPv6 prefix not part of your GUA that you can test from easily for things like ping, website reachability, and testing ACLs and firewall rules.
- Uses a simple IPv6 address plan, specifically for laying out the network prefixes that will be used in the topology.
- Defines a standard loopback, point-to-point, and default gateway schema.
- Uses the same layer 1 and layer 2 topology as your existing network, unless a new network is being built out. So if you are transitioning from a hierarchical design to a leaf-spine topology with VXLAN and EVPN for example, it would make sense to test and validate everything in the new design.
- Defines a checklist of IPv6-only and dual-stack performance characteristics to test in the lab once it is built.
- Matches security principles you are using today. So if you are not doing first-hop-security (FHS) for IPv4, requiring that for IPv6 doesn’t make sense unless you are going to retrofit your entire network use first hop security for IPv4.[TC1] Regardless, you should still test all the services you might potentially want to use like IPv6 FHS, just in case you decide you want them.
- Includes lab documentation to allow those who do not know IPv6 or networking to be able to set up their application or service and have basic steps to test and validate that they have IPv6 connectivity.
Lab Services:
So, what minimum services must be working in the IPv6 lab? They might include:
- IPv6 network connectivity (preferably to the IPv6 Internet) via a public ISP or BGP peering.
- A firewall to protect the perimeter, likely dropping all IPv6 traffic initially for inbound traffic, and then moving to an explicitly permitted rule set for IPv6 traffic as you turn on services in the lab.[TC2] [SH3]
- DNS with a separate name space for the lab.
- DHCPv6 to assign addresses to hosts in the lab.
- IPAM to assign and track GUA and documentation address space in the lab.
- NTP to provide time services.
- SLB to enable IPv4 to IPv6 (and IPv6 to IPv4) connectivity for web and other application services.
- NAT64 running on a router or firewall.
- DNS64 running on the DNS server.
- A method of disabling IPv4 on IPv6-only end-nodes (like DHCP Option 108).
- Some test application services like web services.
- Administrative-plane access methods such as RDP, VNC, and SSH, to manage lab devices using IPv6.
- Management-plane services such as a logging service, flow tools, and SNMP that supports IPv6.
- Security monitoring and traffic blocking capabilities like packet capturing, IPS, and first-hop security[CL4].
Lab Topology:
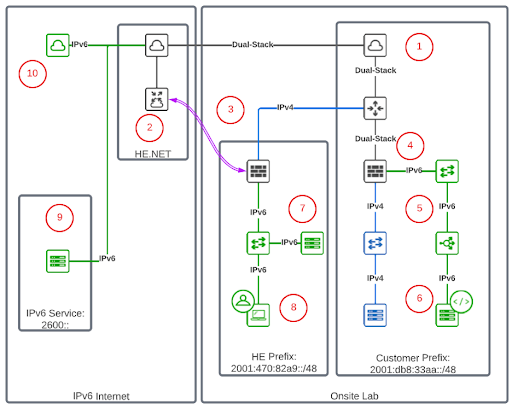
Now that we know what services we need, we can build an initial network design topology and show where these services need to run. Because we can’t match your specific topology, here is a generic network topology that might come close to matching what you run in your environment.

The unique goal of trying to get an external IPv6 prefix that is not part of the GUA you are operating means we have to get creative! This is where using Hurricane Electric’s Tunnel Broker Service becomes incredibly useful. You can use the tunnel broker to set up a dedicated IPv6-over-IPv4 tunnel and then use the service to allocate a /48 of prefix space. Once that is done, you can use that tunnel in your lab to perform end-to-end testing of services.
Here are the 10 simple steps for setting up an IPv6 lab as shown in the diagram above.
- Get IPv6 peering at your Internet edge configured.
- Set up a tunnel broker account on Hurricane Electric.
- Establish a tunnel between the HE Prefix lab firewall and the tunnel broker to run IPv6 in a tunnel over IPv4.
- Set up IPv6 on the Customer Prefix lab firewall.
- Build out IPv6 network services, like a load balancer and network VLANs.
- Configure a web server with IPv6 behind the load balancer.
- Set up IPv6 on the HE Prefix lab and any services or client networks.
- Test IPv6 client access to HE Prefix lab services and Customer Prefix services.
- Test IPv6 connectivity to narrow, specific, IPv6-only sites and services (controlled by firewall rules).
- Test general IPv6 Internet access (requires opening the firewall rules).
Once you have these key elements configured, you can start gradually opening up services you might be running in your lab, but only to open them up to the IPv6 /48 prefix you obtained from the tunnel broker (in the example lab diagram that is 2001:470:82a9::/48). This greatly limits your potential security exposure and gives you a legitimate, end-to-end IPv6 test case. You can then incrementally open more services and test end-to-end connectivity for each of those. You can see the impacts on the firewall, server load balancers, translation techniques and general IPv6 forwarding and packet processing. This gives you real-world operational experience with IPv6 with very little security or operational risk for your organization. It also provides a learning platform for many other teams to leverage to test services and capabilities in a secure way. This allows more teams and individuals to learn IPv6 and how it might impact their operations and design.
With this lab design as the initial topology, we will next work on how to get this working with each of the lab options mentioned at the beginning of the article. That is for a future blog, but hopefully this one gets you thinking about what you want to build, and helps you work out a topology with a set of services that makes sense for your organization.
You can find me on twitter as @ehorley and remember…
IPv6 is the future, and the future is now!
– Ed


